menu

HomeAbout MeFree PrintablesContact MeBlogroll
Showing posts with label Mod Podge. Show all posts

Wednesday, September 9, 2009

$1.00 Shelf Makeover

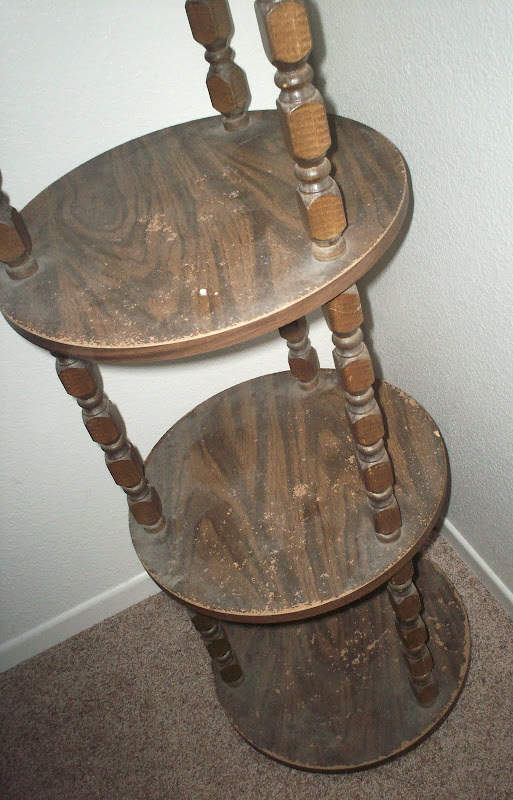
While Mitch and myself were out yardsaling one Sunday morning a couple months back, we ran across this shelf that I really liked. There was nobody outside to help us, and nothing was priced. Frustrated, we left. But I whined and whined about how I really liked the circle shelf, and thought it would look cute in Riley's room {after some altering of course.}

So, Mitch turned around, went and knocked at the door, and got the son to come out and help him. I told Mitch not to spend more than $10 for the thing, and a few minutes later, he was hauling it to our car, after having paid only $1.00 for it!

I was quite happy. Mitch was annoyed that we had another "piece of junk" that I was "planning" to re-do.

I didn't get to it right away like I planned. But over the past few months I {or sometimes we} have refinished every piece of furniture I have bought for that purpose.

Now Mitch finally not only has faith in my ability to finish a furniture project, but he is also impressed with the results, and is more willing to let me shop for future projects!!! YAY!

Wanna see my shelf before and after??

WaaaLaaaaa!


And here is a closer BEFORE....


And AFTER...


I took the whole thing apart and sanded it down pretty good.

Then I spray primed all the pieces once, followed by two coats of Rust-Oleum Green Apple.

The tops were really water damaged.... and since the circle pieces are all laminate, the water damage created raised bubbly areas, and there was NO WAY I was spending that much sanding time in the hope of creating a smooth surface.

So I did the next best thing {which turned out to be a better idea than painting the whole thing} MOD PODGE!!!

I wanted to use products I had at home already. So I found some pale yellow fabric. And used the regular Matte Mod Podge to glue it on.

But I didn't like just the plain yellow with the green, it was kinda boring, and actually looked a bit dirty. So after brainstorming FOREVER, I cut out circles from some orange paper I had.

I arranged them in a way I liked, and Mod Podged them over the fabric. After I finished one shelf, I was VERY happy with the results. So I cut out enough circles for the whole thing... 19 for each shelf, 5 shelves total, that's 95 orange circles I glued on. NINETY FIVE!!!! WAY more work than I planned on doing. And I coulda got the same effect from polka dot fabric, if I'd taken the time to search for some I liked. But I saved money this way, and in the end it was worth it!

I went through an entire bottle of Mod Podge. I believe each shelf got 4 coats. Then I applied 2 coats of Plaid Patricia Nimocks Clear Acrylic Sealer in Gloss.

After it was dry, I put it back together, and smiled lots, because I LOVE the final results!!! It looks awesome in Riley's room, and now I have a spot to put my water, that's within reaching distance from my chair. Which will really come in handy for the hours I'm gonna spend nursing and stuff in the very near future {about 6 more weeks!}

Here's one more picture before I go! :o)


Hope you like my $1.00 shelf re-do!!

Friday, July 31, 2009

Presents for Baby Ezekiel

I've mentioned before that one of my little sisters Danetta is pregnant as well. Her due date is 5 days before mine, and she is also having a boy.

Her and her hubby Jordan are naming their son Ezekiel. They had their baby shower last Sunday. I got to go to California {just for 24 hours, cause Mitch had to work the day before and the day after.}

I got her a gift card,
but also had to make her some handmade stuff as well!!

This is a picture of the nursery bedding she is getting. Although her furniture will be a darker espresso brown.


They wanted books instead of cards. So of course I had to make a little book. It's a 4x4 inch counting book. Those buttons seriously took FOREVER to do!!! All 59 of them!

Here is the front.


Inside.


And back.


I signed it on the back, so he'd never forget it was Aunt Kimmy who taught him how to count in style, hehe!!!


I wanted to make her a decorative magnet board, and originally was gonna use a cookie sheet. But one day at the thrift store I ran across this, and at $1.99, it was perfect!


I sanded the shiny teflon finish off, drilled two holes, spray painted it espresso brown, added pretty scrapbook papers and a monogram, and finished it off with a textured Mod Podge finish and some matching ribbon.

And Tadaaaa!


In the next two pictures you can see the textured finish.


The reason I wanted a magnet board is because I made some bottlecap magnets. I also decorated an adorable keepsake tin to store them in. I figure once she takes the magnets out, the tin can store precious keepsake things, like a lock of hair and a tooth.

Here is the set together.


Here is the tin before:


And after:


And here are the bottle caps before:


And after:


I took my husbands bad habits, and turned them into something cute! And at no extra cost!!!

Anyways, she just loved everything! I got a little embarrassed at the shower when she made a BIG deal outta my present, and it was the only one that got passed around.

I have some pictures of the shower, and my trip to Cali. I'll share them in a separate post, since this one is so long already!

Friday, May 29, 2009

Time Out Bench

Mitch bought this little {really little, it only goes to my knee} bench from our neighbors yard sale for $1. It was adorable and ugly all rolled into one. The bench itself was super cute, but the colors were ugly. See????


So I pondered what to do with it. Paint it??? Stain it?? Where will it go? I finally decided that I wanted it downstairs in my living room area. Where I could keep an eye on the naughty child that would one day sit in it.

So, I sanded it down, and used the same stain I had used on the desk that I redid last year. Then I painted the letters blue, and decoupaged very subtle blue scrapbook paper onto the front of them.

And voila! Much prettier time out bench, that perfectly matches my living room!!!


Here's some "during" pictures. I took it apart and sanded it down.


Then I had to have Mitch help, because stain and polyurethane are BAD to use when pregnant, and I wasn't taking any chances with this little baby of mine!


Here's a couple more angle shots of the little bench.


I really like it. And my nephew Dylan likes sitting in it, even though he know it's where you go when you're bad. He just makes sure that we are all aware that he is not being punished, and is sitting there by choice, lol!

Wednesday, January 21, 2009

Altered Manicure Lap Desk

I bought this Manicure Lap Desk from Pottery Barn Teen a few years back. I totally love it! It is way girlie, and a perfect spot to keep my nail polish and to do my nails!

The only problem was that the top had gotten ugly from me and my sisters spilling nail polish on it. The nail polish took off the cream colored paint, and it looked icky!

So I decided to decoupage the top with some pretty matching paper! Voila!

Here is the Before picture...


And here is the beautiful after shot...


And I know you were dying to see inside! :o)

So here you go!!!


It was super easy to do! And even Mitch thinks it is a HUGE improvement.He seriously thinks I should decoupage EVERYTHING! Kitchen cabinets anyone???

Anywho, I have another project I finished {a pretty makeup brush roll that I made for my sister} but I'll save that for another post! And I taught myself how to knit, so when I finish my scarf I'm making I'll share pictures.

Here are a few more pretty pictures to admire!


Hope everyone out there in bloggyland is having a fabulous day! Thanks for your sweet comments on my previous post! They mean a lot! :o)